So you want to know how to become a Voice Over Talent but don’t know how to pick your Voice Over Equipment? I know your struggle, but especially your excitement!
Have you ever been to a wedding where the band is playing but the mic keeps making this noise and the guitar sounds too loud?… Afterwards, people are saying non-sense comments like “What a bad band”. But the band was actually good! Voices in tone, skilled musicians, and everything. The problem was: the SOUND QUALITY. See? You can be a great Voice Talent, but if you don’t have a Professional Voice Over Equipment, you will certainly go to the misjudged list of “Cheap Voice Talent”. True as it is.
Voice Acting Agents and P2P (Pay to Play) platforms will even ask what equipment you have to make sure you can deliver a Professional Voice Over.
Like many of us at the very beginning, you might be on a budget, right? But don’t freak out just yet… I have been a Spanish Voice Over Talent for over 10 years and know for a fact that there is Affordable Voice Over Equipment to get you there!
I guess many people have you going nuts with so many different opinions. But actually, your choice is quite personal and the best way to start is having in mind how much you want to spend.
________________________________________________
MY SHORTCUT FOR THOSE WHO HAVE NO TIME TO DIG INTO THE OPTIONS
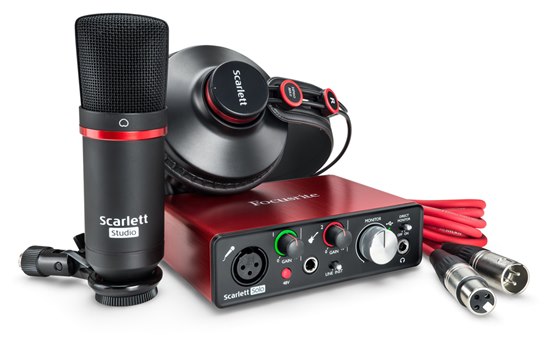
I’ve not only used this kit, but I have happened to see it on the web quite often. So decided to ask around some experienced colleagues and you know what? It looks like it meets the needs of beginners who want to play it safe before pursuing a Full-Time Voice Over business.
• FOCUSRITE SCARLETT SOLO STUDIO (2ND GEN) RECORDING PACKAGE BONUS PAK •
________________________________________________
To understand a little better this technical aspect before getting into the world of Voice Over Service, I gathered my picks to share them with you here.
But again, since this is a personal choice, I gave you some idea of what you need for you to take it from there and extend your search.
HERE THE VOICE OVER EQUIPMENT TO BUILD A HOME STUDIO ON A BUDGET:
1. MICROPHONE
This little guy will be your very best friend, your public, your silent accomplice. All your talent will go through it, so make sure not to get a cheap one and that you feel comfortable with it if you have the chance to test it. Otherwise, it will affect the quality of your work. Remember the Wedding Band?… Well, that sort of thing.
USB Mic is off the list. Get a large diaphragm condenser microphone. Period. You can get a great Mic from $100 to $300 dollars.
NOTE: If you just started and have a comfortable budget, I hardly advise not to get too excited with a very high-end Mic, but instead invest in your editing skills and Voice Over training. Why? Large Diaphragm condenser mics have a highly detailed response. Unless you build a high-end room ambiance and dominate your recording technique already, you can capture the highest quality of sound using one of these mics. Otherwise, it can create an additional issue that you won’t know how to fix yet in terms of technique, ambiance, and editing.
My picks:
#1 Scarlett CM25 comes with a whole kit that I mentioned at the beginning. The quality is very good and is a great option for travelers.
#2 Yeti USB Silver Edition: Only if you can’t afford anything else at the moment. You can find it second hand maybe for $80 dollars.
#3 Rode NT1-A is very popular and costs around $230 dollars. You’ll still need the rest of the equipment and a well-treated room so it doesn’t get unwanted vibration and plosive noises.
2. PREAMP
This is a magic box that enhances the quality of your audio. Think about it as a translator, or a bridge. How does it work? Well, by amplifying the signal that your Mic sends, converting it into a language that both your computer and your Recording Software will understand. So pretty! Ah, and by the way… Your Condenser Microphone needs fuel, so guess who’s in charge? Yeap, the preamp. Told ya’, it’s a magic box!
NOTE: I believe in love, but you cannot have a country new age guy date a fancy Manhattan girl. They just don’t match. Same happens to your Mic and your interphase. If you get a good quality Mic and a cheap preamp, you’ll compromise the quality of your sound. Don’t throw your money away. Make good decisions.
My picks:
#1 Focusrite: comes with the whole kit Scarlett Solo Studio, and it’s pretty easy to use for what you need. It’s a cardioid Microphone, which is the set Up for Voice Over Recording. Means that it will only pick sound directly coming from the front.
#2 Presonus Bluetube V2
3. HEADPHONES
You’re looking for: Closed Back and Circumaural headphones. Means that they don’t filter noise into the microphone for a cleaner sound.
NOTE: Even when there are many options out there, I’d suggest to go directly to a store and try them all to see how it feels to you. Personally, if I’m annoyed by the Headphones, I’ll be distracted.
My Picks:
#1 SONY MDR-7506 – Great sound, VERY comfortable.
#2 Sennheiser HD 280 Pro – Still affordable but, for me, not as comfy as my #1 pick.
#3 BayerDynamic DT250 headphones – Very solid and durable
4. MIC STAND
The Mic is untouchable when you’re doing a Voice Over Recording. So you need a stand to hold the Microphone while you record.
Types of stand:
Overhead Stands
Round Base Stands
Low-Profile Stands
Tripod Stands
Tripod Boom Stands
Desktop Stands
NOTE: I personally don’t like stands if I’m in a small space. Cause chances are that I’ll end up stepping on it. That’s why I rather use a Boom Arm that holds it in the air so I have enough room for my legs and arms to move. So if you’re good in terms of space, just go for the conventional Tripod Stand.
My picks:
#1 Boom arm on a floor stand
#2 Desktop Boom Arm
5. SHOCKMOUNT
In order to eliminate most of the vibration, the Shockmount utilizes elastic bands. Believe it or not, a good mic picks up what your ear wouldn’t.
My Picks:
Well… They are not really expensive. Check the reviews on Amazon and select a Universal Shock Mount so it matches with your Mic’s reference.
6. POP SCREEN / POP FILTER:
Being a Condenser Mic is hard for they are so sensitive that can pick plosive sounds like “P”. Besides having a good recording technique to prevent this from happening, you are better off having a screen that filters and diffuses those hitting sounds.
7. COMPUTER
Voice Over Recording is becoming a remote job. If you want to move easily from one place to another and be able to record while traveling, you should have a Laptop.
Mac seems to be the most popular choice for Voice Over Recording and editing. But if you’re curious about the options, in this post they grouped a list of Laptops: 10 Best Laptops for Music Production and Recording in 2017 – Updated List
8. RECORDING SOFTWARE:
The only difference between these programs is the complexity of use and the price. But they all pretty much do the same.
You need to become very agile when recording and editing your takes. So make sure you pick an option that is friendly to your eyes and level of understanding.
My Picks:
Audacity
If you’re just getting started and while you train your editing skills, this is a good option compatible with Mac and PC. But move to a more professional Software as soon as you have the chance. And guess what: it’s FREE.
Adobe Audition
For professional voice talent, this is a popular recording and editing software. It allows you to mix and edit with great effects features for a professional sound. And it’s actually quite easy to use!
Pro Tools
Want to record, edit, mix, and master like a real pro? Then this is your pick. Most high-end recording studios use this one. Only attempt to get it if you are serious about becoming a Professional Voice Over Talent and are ready to invest in some training to understand the recording technology.
NOTE: I’d advice to for this one only if there is a solid Voice Over business already built.
9. ACOUSTIC TREATMENT
The idea is to have an echo-free space to record. So you are going to need some foam that breaks the wave so it does not bounce against the surfaces around.
One of the most important things to get is BASS TRAPS. Even if you still don’t have the budget for a whole set of soundproofing foams, getting bass traps will keep you safe.
Pick a room that is as far away as possible from areas with a lot of traffic. A closet is a great choice to start, and your clothes can perform as anti-reflection surfaces.
I’d also make sure that the neighbors are away at certain hours to assign recording sessions with no noise leaks.
NOTE: If you’re on a budget and need a fast solution, I’d recommend a Portable Microphone Studio Voice Booth Isolation Box
You can even build it with a conventional IKEA box and use the remaining money it would cost in 6 good quality Auralex squares of foam
Hope I have given you a sharp idea of the equipment you’ll need to Become a professional Voice Over Talent. Do not rely on the opinion of just one post. My advice is to go and search, test, ask the community on and offline.
Good Luck and Rock on!

Comments